
Integrate MS Defender for Cloud with Autobahn
Learn how to integrate Microsoft Defender for Cloud with Autobahn
1. Why integrate Microsoft Defender for Cloud with Autobahn
Microsoft Defender for Cloud is a cloud-native application protection platform that helps strengthen your security posture, enables protection against modern threats, and helps reduce risk throughout the cloud application lifecycle across multi-cloud and hybrid environments.
Integrating Microsoft Defender for Cloud with Autobahn allows you to see assets and vulnerabilities discovered by MS Defender directly in Autobahn. Once the integration is complete, Autobahn processes the findings to correlate, consolidate, and contextualize the ingested data to impact risk and remediation priority.
2. Prerequisites and user permission
To enable the integration, you need to provide Autobahn with the following MS Defender for Cloud data:
- Tenant ID
- App ID
- App secret
To provide the information above, please make sure that:
- Microsoft Defender for Cloud is enabled for your Azure subscription(s).
- All subscriptions have the Defender for Cloud default policy enabled.
- The following privileges are needed for a user in Azure to generate the connection details:
- Sufficient privileges/permissions to create an application.
- Sufficient privileges/permissions to create a Service Principal account.
- Sufficient privileges/permissions to assign the Service Principal account a “Reader” role to the relevant subscriptions.
a. Register new application
1 – Log in to the Azure Portal.
2 – Navigate to Azure Active Directory. Go to the App registrations and click the New Registration button.

3 – On the app registration page:
- Name: Enter a name of your choice (e.g. Autobahn)
- AccountType: Accounts in the organizational directory only (Default Directory only – Single Tenant)
- Redirect URI: This can be left blank.

4 – Click the Register button.
b. Get Client ID and Tenant ID
1 – Go to the Application overview page you have created above.

2 – Save the Client ID and Tenant ID so you can later use it to configure the Autobahn Fit integration.

c. Create Client Secret
When we register a new application in Azure, it does not have any client secrets. To create a Client Secret:
1 – Navigate to Certificates & Secrets from the left navigation.

2 – Click the New Client Secret button.
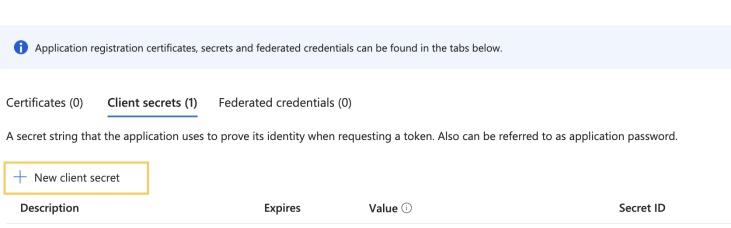
3 – Enter the Description and Expiry for the Client Secret and click the Add button. Once the secret expires, you will have to create a new one and set it up again in Autobahn.

4 – The system adds the Client Secret and displays the details on the same page.

5 – Save the Client Secret to use it later in this article.
d. Assign the Reader role
After collecting the Client ID and Tenant ID, navigate to the Subscription page and assign a reader role to the subscriptions to sync Azure with Autobahn. To assign the reader role:
1 – In the Azure Portal, search Subscriptions in the search bar and click it.
2 – On the subscriptions page, the system displays all Azure subscriptions.

3 – Search and click the subscription to which you want to assign the reader role for the app. Then go to the Subscription Overview page on the Azure Portal.
4 – Click the Access Control (IAM) button from the left navigation.

5 – Click the Add button and then click the Add role assignment option.
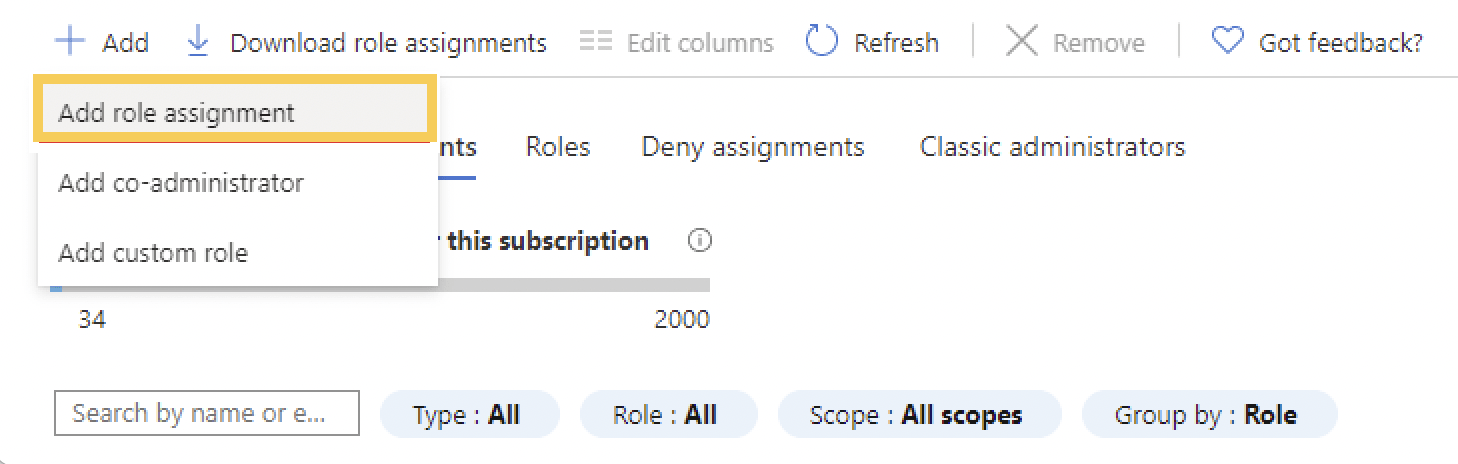
If you don’t have permission to assign roles, the Add role assignment option will be disabled.
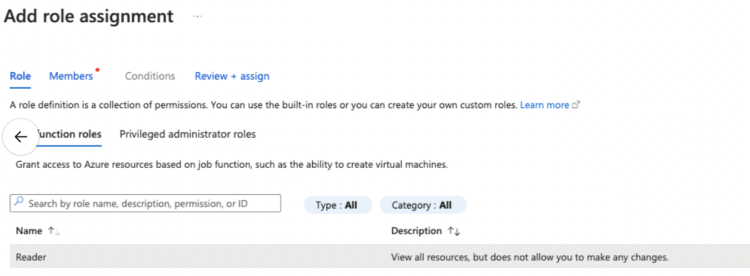
6 – On the Role tab of the Add role assignment page, select the Reader role and click Next.
7 – Navigate to the Members tab, and click the + Select members button.

8 – A dropdown will appear. Select the app that you previously created from the list.
9 – Navigate to Review + assign tab. If you filled all data correctly, click the Review + assign button and you are done.

3. Integrate MS Defender for Cloud with Autobahn
After you completed the above preparation, login to your Autobahn account and navigate to the Integrations page. On this page:
1 – Click the Configure button on the Microsoft Defender for Cloud tile
2 – On the MS Defender for Cloud integration page, set up the connector as per the data you’ve generated earlier:
- Tenant ID: Enter the Azure App ID.
- App ID: Enter the Azure Subscription ID.
- App Secret: Enter the Client Secret value.
Then click the Test and Save button.
3 – To confirm it the integration is complete, navigate to the Integration page. Once connected the Microsoft Defender for Cloud tile will show an active toggle and gives you the possibility to edit.
You can view the imported vulnerabilities on the Issues page by using the Origin filter, and the corresponding assets on the Assets page by using the Source filter.
5. Enable/disable integration
You can temporarily pause the integration with Microsoft Defender for Cloud by toggling it off. This will stop Autobahn from fetching new data, while retaining your credentials and all previously imported information.
When you’re ready to resume, simply toggle the integration back on. Autobahn will automatically continue fetching data from where it left off, starting from the last successful sync.
6. Integration data mapping
After the integration is completed, Autobahn pulls vulnerabilities and assets, and maps these into specific fields.
a. Data mapping machine / Assets
Based on the machine data that Autobahn gets, here is how we map the data.
| Microsoft Defender for Cloud | Autobahn asset |
|---|---|
| publicIpId | external_id |
| name | name |
| publicIp | IP |
| fqdn | DNS |
Note: MS Defender for Cloud does not provide tags related to the underlying assets. However, if you also enable the Microsoft Azure integration, the mapping will automatically happen and we can ingest the tags related to your Azure assets.
b. Data mapping assessments / Vulnerabilities
Based on the assessment data that Autobahn gets, here is how we map the data.
| Microsoft Defender for Cloud | Autobahn vulnerability |
|---|---|
| description | title |
| severity | severity |
| cves.title | cve (Decoupled into a single issue for each CVE) |
7. Vulnerability score mapping
All collected issues from Microsoft Defender for Cloud are assessed and enriched with our threat intelligence to reflect the correct severity. Microsoft Defender for Cloud relies on two built-in scanners for their results:
- Scanner powered by Qualys
- Scanner powered by Microsoft Defender Vulnerability Management
8. API endpoints in use
To get the data from Microsoft Defender for Cloud we use the Azure Resource Graph. We use the Official JavaScript library from Azure to communicate with Azure Resource Graph.
Quickstart: Your first JavaScript query – Azure Resource Graph
Machines or assets
microsoft.compute/virtualmachines
microsoft.network/networkinterfaces
microsoft.network/publicipaddresses
Assessments of vulnerabilities
microsoft.security/assessments
microsoft.security/assessments/subassessments